This user guide details the main steps that in JMap Cloud Portal lead to the distribution of JMap Cloud data via a public or restricted access cartographic application.
Each member of an organization has one of three roles in JMap Cloud Portal: administrator, editor, or viewer. The Roles section details the functions specific to each role. Only administrators and editors access JMap Cloud Portal. Viewers access applications that stream data from JMap Cloud. Administrators and editors view all sections of JMap Cloud Portal but only the functions that correspond to their role are activated.
The following figure summarizes the workflow with the roles involved.
This step requires the editor to connect the data to JMap Cloud by creating spatial data sources. These can be GIS files, spatial data servers, satellite images, etc. Files are uploaded and their data is copied into JMap Cloud databases or connections to data web services are created to make the data available to configure projects.
See Connecting Data: Spatial Data Sources for more details on this.
JMap Cloud data is organized into projects. A project contains information about map layer definitions, as well as settings governing access control (security), queries, units, etc. By creating a project, the editor defines the visual appearance of the map and the information it will contain.
See Organizing Data into Projects for more details on this.
In this step the editor creates the cartographic layers of the project. Each layer of the map is associated with a spatial data source. For each layer, the editor defines the style (the way the elements of the layers will be drawn), the labels, the themes, etc. It can also define access control layer by layer.
See Configuring Cartographic Layers for more details on this.
The project is disseminated to end users via mapping applications. Depending on the access controls configured by the editor, the applications may be public or may be accessible through the authentication of the user who holds the viewer role.
The JMap NG User Guide provides details on JMap Cloud mapping applications.
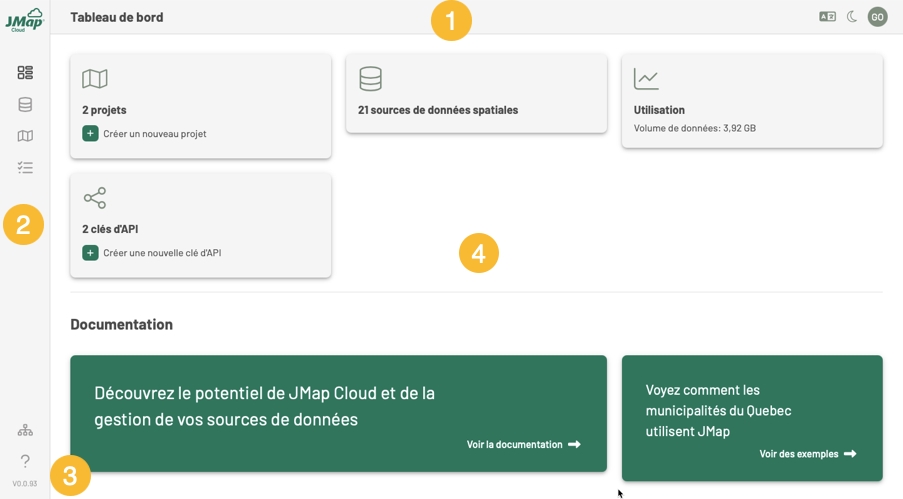
The JMap Cloud Portal user interface looks like this:
1
Header bar. Indicates the section of JMap Cloud Portal that is displayed in the main interface. Icons allow you to change language and graphical interface settings. Information of the logged in user as well as functions to change password and log out.
2
Tools bar. Each icon provides access to a section:
3
Access to JMap Cloud Portal documentation. The JMap Cloud Portal version is indicated at the bottom of the bar.
4
Section interface.
In the sections, information is presented in table mode and sometimes also in card mode.
In the tables, the rows correspond to the section's resources: organization members, API keys, files, tasks, spatial data sources, etc.
You can select the quantity of rows to display per page: 25, 50, 100. A table can have multiple pages. The footer displays the number of rows on the page and the total number of rows in the table.
For each resource, a menu is displayed when the cursor is placed on the attribute name. The functions offered in the menu vary depending on the resource:
Show information
Edit information
Create a source
Interrupt
Delete
...
The table columns correspond to the attributes. The table header presents the attribute names.
Sort table rows ascending or descending
Hide attribute
Show column
...
A display of resources in cardboard mode is available in the Projects section. Buttons allow you to add resources in each section except the Jobs section.
A JMap Cloud administrator in your organization will send you an invitation to join the JMap Cloud Portal.
The invitation sent by JMap Cloud contains a hyperlink that takes you to the JMap Cloud Portal login page. The interface for accepting the invitation to join JMap Cloud Portal displays your email address and the field for creating your password.
Once the password is created, click on Continue to progress through the login procedure detailed in the next section. If you already have an account, you can log in directly by clicking on Sign in.
Once you have created your account, you access JMap Cloud Portal via:
The JMap Cloud website when you press the Login button.
The JMap Cloud Portal website:
To continue the connection:
Click on Login to display the JMap Cloud Portal login page.
Enter the email address and password with which to log in to JMap Cloud Portal and press Continue. Once authentication is successful, the following interface prompts you to select your organization.
Click on the organization you want to connect to. A new authentication is performed and you access the JMap Cloud Portal of the selected organization.
The home interface displays the which provides an overview of the JMap Cloud Portal resources for which you have access permissions.
: provides an overview of the organization's resources to which you have access.
: contains the functions that allow you to manage the administrative aspects of the organization: members, invitations, etc.
: Introduces functions to create and manage the spatial data sources you have access to.
: contains functions for creating and managing projects.
: contains tasks performed by JMap Cloud Portal.
Icons are enabled or disabled based on the role of the logged in user. See the section for more details.
For each attribute, a menu is displayed when the cursor is placed on the attribute. The menu varies depending on the resource, but it offers functions for:
Filter table rows based on an attribute value. When a filter is applied, the icon displays next to the attribute name.
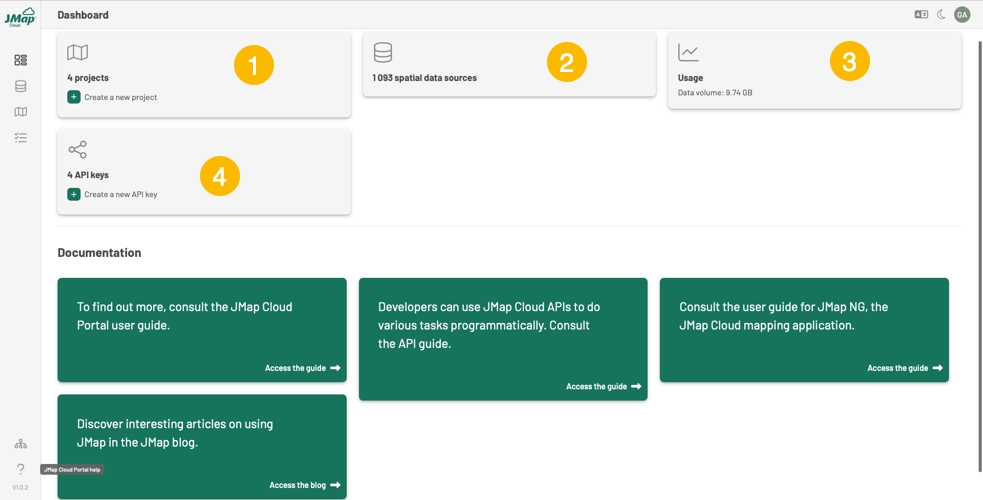
The dashboard is the home section of JMap Cloud Portal. As its name suggests, this section offers an overview of the status of resources such as projects and spatial data sources and also allows you to create some of them directly.
1
2
The Spatial Data Sources card displays the number of data sources to which you have access, either because you are the owner or because you have access permissions.
3
Usage displays the organization's data volume. Only members with the Administrator role see this card.
4
The Projects card displays the number of projects to which you have access, either because you are the owner or because you have access permissions. You can create a new project by pressing .
The API Keys card displays the number of API keys configured by your organization. Only members with the Administrator role see this card. You can create a new API key by clicking on .


